
|
Miter She Wrote
Jessica Four-Patch presents: Case #108
© 1997 Merry May
Make a 64" square quilt top which includes an optional friendship block swap mid-way through the series. Or, keep all of your own blocks and gather your own bunches of signatures for your quilt. After all, as they say, "Friends are the Flowers in the Garden of Life!"
|
Please complete Part 6 before going on.

*** Part 7 ***
For those of you who are anxiously awaiting the return of your Friendship Basket Blocks (as well as those of you who are not!), this is certainly no excuse to sit by with idle hands!! We have another task for you to tackle as you await further instructions!
Remember the forty 4" squares you cut from your Fabric B 'way back at the beginning of this series? Well now you need to dig them all out. You will also need a circular template that measures about 4" in diameter. (Hint: you may have a can of fruit or a coffee cup in one of your cabinets which is approximately this size and which can be traced around.) If you can't find anything of about this size, then you can just "eyeball" the shape.
Whatever method you use to come up with a template, you now need to cut a 4" circle from each of your 4" squares.
Next, make 40 "yo-yo"s from these circles. To do this, turn under the raw edge of one of your circles a scant 1/4" (or less, if you can manage it) with wrong sides together, as shown in the diagram below. Thread a hand-sewing needle with a single ply of thread, and knot the thread. Turning the raw edge as you go, do a running stitch around the outside of the circle (through both layers of fabric). It's best if your stitches are each about 1/4" long (yes, it's OK if they're big!!). Once you've made your way around the circle, pull the thread tightly to gather your stitches. Be sure your fabric is facing right-side out! Then, knot your thread on the seam allowance just inside the yo-yo.
Repeat this procedure 39 times, or until you've yo-yo'd yourself to the point of exhaustion!!
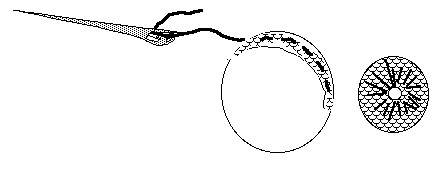
Now, don't start thinking your toils are complete! (There's more!)
Remember your "leafy green" Fabric D? Well, now it's time to put it to good use. NOTE: This portion is optional for this project, because it will lead you into the world of applique! If you do not wish to add an appliqued vine to your quilt top, then you may ignore this part of the instructions.
If you do wish to proceed, then you will need to make approximately 9 yards of 1/4" bias tubing from your remaining piece of Fabric D (you were previously instructed to cut eight 2" strips from it for your binding). To do this, you may use your own favorite method, or you may follow the instructions below:
|
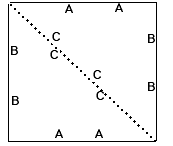
Cut a 19" square of Fabric D. Mark the wrong side of it as shown in the diagram at right.
Cut on the diagonal line.
(Keep going -- there's more!)
|
|
With right sides together, sew along the "A" edges, using 1/4" seam allowance. Please Note that you will need to offset the ends of the big triangles slightly in order to achieve an accurate seam here. See the diagram below for help.
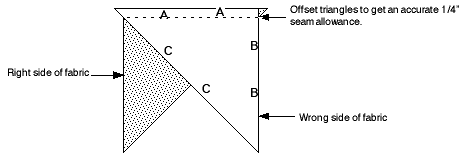
Press seam open.
|
Lay out your fabric wrong side up, and mark it as indicated at right. The line which is being marked should be 1" wide (measured from the raw edge of Side "C"), and about 6" long. Don't forget to include the "X"s, too.
Next, cut on the line you just drew which is about 6" long.
|

|
|
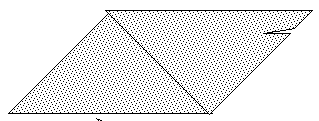
Turn the piece over so it looks like the diagram at right.
|
|
|
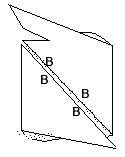
Fold the lower left corner in until it reaches the center seam. Fold the upper right corner in until it also reaches the center seam. (These are the "B" edges you marked earlier.
Next, with right sides together, align the "X"s you marked. Again you will offset the corner angles in order to get an accurate 1/4" seam allowance. Pin and sew along the "B" edges to make a big tube of fabric.�����
Press seam open.�����
|
|
Turn the tube right-side-out. (If possible, put the tube over the end of your ironing board to make it easier to cut your bias strip.) Continuing with the small section you already cut, mark and cut a 1" wide continuous strip. Keep going until you run out of fabric.
Next, with wrong sides together, sew a 1/4" seam along the long edge of your giant bias strip. Then go back and press so the seam is on the bottom of this long, skinny tube. (If you have them, bias press bars are helpful for doing this.) Wrap all of this around an empty cardboard paper towel tube and take a little break until your Friendship Basket Blocks arrive in the mail.

... and don't you worry.... Jessica will be back with Part 8 in a jiffy!
 World Wide Quilting Page * Mystery Quilts


