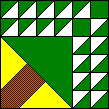
 Pinetree
![]()
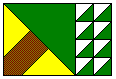
![]() Fabric - A
Fabric - A
![]() Fabric - B
Fabric - B
![]() Fabric - C
Fabric - C
![]() One background fabric
One background fabric
 |
one 12-1/2" square of fabric A |
 |
one 12-1/2" square of fabric B |
 |
two 9-1/2" squares of fabric C |
| two 3-1/2" squares of fabric A | |
 |
nine 3-7/8" square of fabric A |
 |
nine 3-7/8" squares of background fabric |
| 1) On the wrong side of the background fabric squares lightly draw a diagonal line as shown. | |
| 2) Take one of the marked background fabric square and one of the 3-7/8" square of fabric A and place, right sides together, with the diagonal line placed as shown. sew 1/4" away from both sides of the diagonal line. | |
| 3) Cut apart the squares sewn together in Step 2 to create a total of eighteen half-square triangle units. Press the seam allowances toward the fabric A triangles. The completed half-square triangles units should measure 3-1/2". | |
| 4) Take two of the half-square triangle units completed in Step 3 and piece together as shown. Repeat three more times with six more of the half-square triangle units. Press the seam allowances on two of the units in one direction and the seam allowances on the other two in the other direction. The completed units should measure 3-1/2" x 6-1/2". | |
| 5) Join the units completed in Step 4 together as shown, alternating the pieces so that the center seam allowances of one piece face the opposite directions of the seam allowances of the piece being joined. Press the seam allowances all in one direction, either left or right. The completed unit should measure 6-1/2" x 12-1/2". | |
| 6) Take one of the half-square triangle units from Step 3 and one of the 3-1/2" fabric A squares and piece together as shown. Repeat with one more half-square triangle unit and the remaining 3-1/2" square of fabric A. Press the seam allowances toward the fabric A square. | |
| 7) Take the two units from Step 6 and join together as shown. Press the seam allowance in either direction. The completed unit should measure 6-1/2". | |
| 8) Take the unit completed in Step 5 and the unit completed in Step 7 and join together as shown to complete the top portion of the quilt Block. Press the seam allowance toward the Step 7 unit. This completed unit should measure 6-1/2" x 18-1/2". | |
| 9) Take two of the remaining half-square triangle units and join together as shown. Repeat with the six remaining half-square triangle units. Press the seam allowances on two of the units in one direction and the seam allowances on the other two in the other direction. The completed units should measure 3-1/2" x 6-1/2". | |
| 10) Join the units completed in Step 9 together as shown, alternating the pieces so that the center seam allowances of one piece face the opposite directions of the seam allowances of the piece being joined. Press the seam allowances all in one direction, either up or down. The completed unit should measure 6-1/2" x 12-1/2". | |
 |
11) Lightly mark a diagonal line on the wrong side of the two 9-1/2" fabric C squares as shown. |
 |
12) Place one of the 9-1/2" fabric C squares, right sides together, with the 12-1/2" brown fabric square with the marked diagonal line placed as shown. Sew on the marked diagonal line. |
 |
13) Press the 9-1/2" fabric C square back over the sewn line as shown.
Note: Unless the quilt Block will be hand quilted later, it is not necessary to trim away the additional fabric. If the Block will be hand quilted, trim away the extra fabric 1/4" away from the sewn diagonal line. |
 |
14) Place the other 9-1/2" fabric C squares, right sides together, with the unit from Step 13 with the marked diagonal line placed as shown. Sew on the marked diagonal line. |
 |
15) Press the 9-1/2" fabric C square back over the sewn line as shown.
Note: Unless the quilt Block will be hand quilted later, it is not necessary to trim away the additional fabric. If the Block will be hand quilted, trim away the extra fabric 1/4" away from the sewn diagonal line. |
 |
16) Lightly mark as diagonal line on the wrong side of the 12-1/2" fabric A square. |
 |
17) Place the marked 12-1/2" fabric A square on top of the unit completed in Step 15, right sides together with the marked line placed as shown. Sew on the marked line. |
 |
18) Press the 12-1/2" fabric A square back over the sewn line as shown.
Note: Unless the quilt Block will be hand quilted later, it is not necessary to trim away the additional fabric. If the Block will be hand quilted, trim away the extra fabric 1/4" away from the sewn diagonal line. |
 |
19) Join the tree trunk completed in Step 18 to the unit completed in Step 10 as shown to completed the lower section of the quilt Block. Press the seam allowances toward the Step 18 unit. The completed unit should measure 12-1/2" x 18-12". |
|
20) Piece together the upper section of the quilt Block completed in Step 8 and the lower section of the quilt Block completed in Step 19 to complete the Pinetree quilt Block. Press the seam allowance toward the Step 19 unit. The completed Pinetree quilt Block should measure 18-1/2" which includes a 1/4" seam allowance on all sides. |